Maker Monday: Kids can make these easy, adorable night lights
The glowing faces of these Halloween-themed (but not at all scary) night lights can add a bedtime smile — and a sense of pride in making something awesome — when kids try this Maker Monday activity.
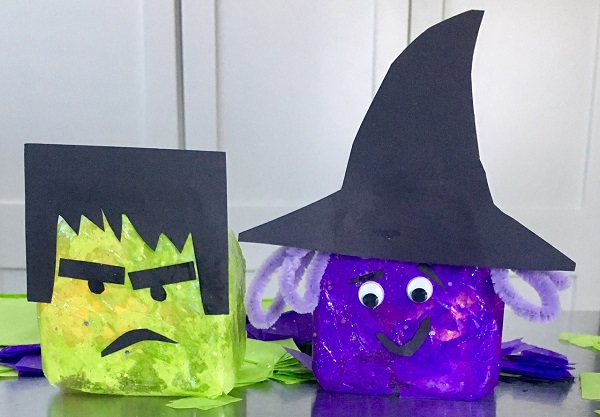
The kid-designed project begins with a small empty jar. It can be a glass jar (baby food jars work well or other small jars emptied of whatever came in them), but you can also use any kind of clear plastic container. Kids just need to add a colorful layer of tissue paper and create any kind of face that they’d like.
They can accessorize their creatures with features cut from construction paper. Googly eyes give a silly touch to a Halloween-themed face. Or kids can make a spider night light with pipe cleaner legs. They can also have fun making a witch’s hat or Dracula’s fangs from construction paper. Kids can also use white tissue paper for a glowing ghost or orange tissue to make a bright jack-o-lantern — or go for something that’s not at all related to Halloween, like a bright yellow smiley face emoji!
These homemade nightlights are inexpensive to make. You can find all the materials at a dollar store and you may already have some of them around the house. (A note to kid makers: Please work with a parent or caregiver on Maker Monday projects and always be careful when using tools of any kind, including scissors.)
Maker Monday materials:
- small, clean empty jars or clear plastic containers with lids
- scissors
- tissue paper, cut into approximately 1-inch squares
- school glue
- Mod Podge
- foam paintbrushes
- battery-powered tea lights
- construction paper
- plastic googly eyes (optional)
STEP 1: Decide what you want your nightlight creature to look like. Then squeeze a small amount of glue into a little bowl. (Paper cupcake liners make great disposable “bowls.”) Use the foam paintbrush to paint the sides of your jar with the glue. Then cover the glue with overlapping pieces of tissue paper in whatever color (or colors) are best for the creature you’re making.
You can add extra bits of glue if you need to, so you can cover the whole jar with tissue.
STEP 2: Allow the glue and tissue to dry. (This is a good time to cut out bits of construction paper that you’ll use to make the face and hair for your creature, and maybe even a hat.) Once the glue and tissue are dry, paint over the tissue with a layer of Mod Podge to seal edges and give your nightlight a smoother finish. (We used a sparkle version of Mod Podge to add a bit of extra shimmer, but you can use any kind.)
STEP 3: Once the ModPodge is completely dry, this is when kids can begin to give their night light personality. Glue on all the pieces of their funny face (made from construction paper and perhaps googly eyes), and add any details you’d like — maybe a witch’s hat, a Frankenstein hairline, pipe cleaner hair and other silly surprises.
STEP 4: Once all the glue is dry, switch on a battery-powered tea light and place it inside your jar. Put the lid on the jar and enjoy the friendly glow of your homemade night light.
Bedtime won’t be spooky at all with this silly, homemade night light — even on Halloween!
Want more at-home fun creating cool stuff and making beautiful things? Check out more Maker Monday projects right here. Do you have an idea for a Maker Monday craft project? If so, please share it with Kidsburgh! Send your maker activity ideas to info@kidsburgh.org.


